Written by Outrank. Published by Mallary Labs LLC.
Published .
How to Post a Longer Video on Instagram: Limits and Steps
Most guides on how to post a longer video on Instagram treat the longest file the app will accept as the answer. That is the wrong question. A file that uploads cleanly can still sit unseen by anyone who doesn't already follow you. The length that gets recommended and the length the app will store are two different decisions, and the first one should pick the format.
Table of Contents
- Instagram Video Length Limits at a Glance
- Choosing a Format and Splitting Long Videos by Goal
- How to Post a Long Video as a Reel, Step by Step
- Automating Long Video Uploads Through the API
- Failed Uploads and How to Fix Them
- Final Pre-Publish Checklist
Instagram Video Length Limits at a Glance
Yes, you can post a longer video on Instagram, and the in-app route is a Reel. Instagram's Reels guidance says you can record and edit one clip or several clips whose combined duration reaches up to 20 minutes. You don't have to split a long recording into separate posts. One Reel can hold a continuous take or several edited segments, provided the total stays inside that cap.
Length alone doesn't decide who sees it. The same guidance says Reels longer than 3 minutes will not be recommended to new audiences. That makes 3 minutes the practical discovery threshold, while 20 minutes only sets what is possible to publish.
| Format | Length limit | What it means for reach |
|---|---|---|
| In-app Reel, combined clips | 20 minutes | Reaches existing followers; not recommended to new audiences beyond 3 minutes |
| Reel recommended to new audiences | 3 minutes | Best length for discovery by people who do not follow the account |
| Reel uploaded through the API | 15 minutes | Enforce this stricter limit in automated publishing |
| Instagram Story video segment | 60 seconds | Longer video must be trimmed or split into sequential segments |
Read the two right-hand columns as different jobs. The length limit tells you what the format will accept. The reach note tells you who is likely to see the result. A Reel aimed at people who already follow you can use the full in-app ceiling and still do its job through the profile, the follower feed, or a direct share. A Reel aimed at people who don't follow you should stay at or under the discovery threshold, even when you have more footage.
Say a founder records a 12-minute interview. The full cut can go up as one Reel for existing followers. A new viewer is far more likely to meet a 2-minute cut. Search-oriented captions, a collaborator share, or paid promotion can help the long version, but they don't replace recommendation eligibility.
Check the length of the final export, not the raw recording, against the row that matches your goal. Trims, titles, and end cards change the runtime after the edit. Older guides that cite IGTV describe a long-form feed format that has since been replaced. Today's route for a long video is Reels.
Choosing a Format and Splitting Long Videos by Goal
Instagram will accept more video than it will recommend. That gap should drive the format choice. Instagram's Help Center sets two different numbers: Reels can be recorded and edited for up to 20 minutes, but Reels longer than 3 minutes are not recommended to people who do not already follow the account. A 19-minute Reel is a valid upload and a weak discovery bet. Pick the audience first, then the format.
| Goal | Best format | Length to aim for | Trade-off |
|---|---|---|---|
| Serve existing followers | Reel shared to profile | Up to 20 minutes | Fewer recommendations to new viewers |
| Reach people who do not follow yet | Reel under 3 minutes | 3 minutes or less | Full content must be cut down |
| Keep a long tutorial whole | Full Reel plus a short teaser | Up to 20 minutes, teaser under 3 minutes | Two posts to manage and link |
| Share sequential updates | Story segments | 60 seconds each | Content disappears and is hard to discover |
Serving existing followers fits a full Reel shared to the profile. A customer-only feature walkthrough or a recorded lesson for people who already opted in can use the long form. The cost is reach: Instagram has little reason to push a long Reel beyond the audience that already knows the account.
Reaching people who do not follow yet fits a Reel at or under the discovery threshold. A 12-minute product demo needs a 90-second cut that opens with the outcome, shows the key step, and names the result. The shorter file loses context, but it gains recommendation eligibility, which is the main route by which strangers meet the post.
Keeping a long tutorial whole means two posts. Publish the full Reel for people who want the lesson, and a teaser under the discovery threshold that points at it. You manage and link two assets instead of asking one file to do both jobs.
Sharing sequential updates fits Stories. Instagram's Story guidance treats 60 seconds as the segment threshold, and a video longer than that has to be trimmed or divided. Stories are built for short, temporary updates. Reels are built for a durable post. That guidance covers Stories, not Reels. For Reels, export vertical at Instagram's recommended resolution and frame rate, then check the file on a phone before publishing.

A walkthrough with two different jobs
A SaaS founder has a 14-minute product walkthrough and wants new trial sign-ups. I would not post the whole file as the growth asset. Cut a 2-minute teaser that shows the outcome, publish that for discovery, and point to the full version in the caption. The same founder announcing the feature to current customers can post the entire walkthrough, because those viewers already know the product.
If the source is a recorded interview or show, the same split applies off-platform. The podcast content strategies from Podmuse are a useful model for turning one long recording into a short public cut and a full episode people can finish elsewhere.
Where to cut
Split only when the file is longer than the limit you chose. A 25-minute webinar is over the Reel ceiling, so break it at topic changes into two Reels of about 12 to 13 minutes each. Open each part with a one-line summary of what this part covers, and point to part two from part one.
A 5-minute tutorial forced through Stories becomes five sequential 60-second segments. That suits a behind-the-scenes diary. It does not suit a tutorial you want people to find next month.
Practical rule: Never cut on the clock. A mid-sentence break at the ceiling confuses viewers and kills the next tap.
Title each part with its order, such as Part 1 of 2, so someone landing on either Reel can find the series. Check the final file in a phone player before publishing, and decide whether you want a temporary sequence or a post that stays on the profile.
How to Post a Long Video as a Reel, Step by Step
Use Reels, not a standard feed-video path, when the file is long. Instagram's publishing help permits Reels up to 20 minutes when you create or edit them in the app, while anything past 3 minutes is not recommended to new audiences. The steps below get a clean file onto the profile. They don't change who the recommendation system will show it to.
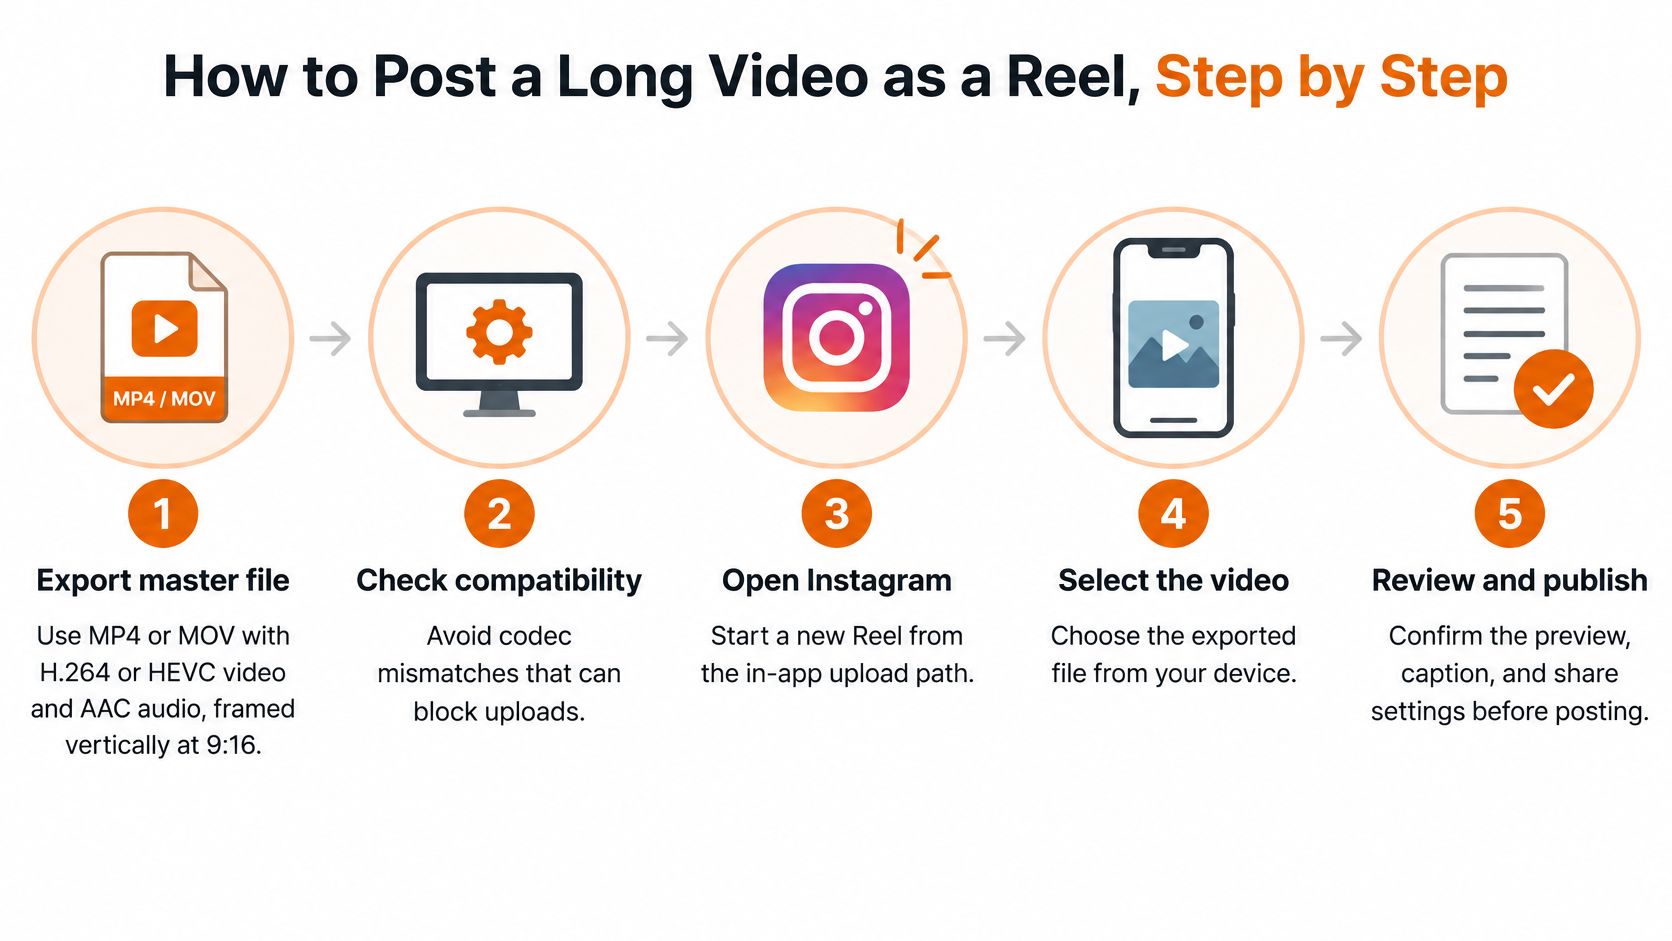
- Export a master as MP4 or MOV, with H.264 or HEVC video and AAC audio, framed at 9:16. Mismatched codecs are a common reason an upload fails before you ever see a preview.
- Confirm the export meets the resolution and frame rate Instagram recommends for Reels, then play the file in a player that shows the true runtime. A timeline that looked fine in the editor can run long once titles are burned in.
- Open Instagram, start a new Reel, and add the clips. One long recording or several edited segments can combine up to the in-app ceiling. If discovery is the goal, split into logical chapters instead of uploading the master whole.
- Trim what you don't need and burn captions into the picture. Many people watch with sound off, and interface overlays hide text parked at the edges. Keep essential words inside the safe center of the frame.
- Choose a cover frame that states the topic, and put the strongest hook in the first few seconds. A slow logo opener wastes the only window a new viewer is likely to give you.
- Preview the full video on a phone, not a desktop monitor. Phone playback catches bad cuts, quiet audio, and drift that a large screen hides. Skipping this lets a mistimed segment go live to every follower.
- Decide whether to share the Reel to your profile feed, then publish or schedule it. Feed sharing puts the long cut where followers browse the grid. Leaving it off keeps it on the Reels surface.
When the Reel is sized correctly, the grid shows your cover, the post opens in vertical full frame, captions stay clear of the buttons, and the audio stays locked to the picture through the last second. If you later publish through an API, the source file has to stay at a publicly accessible URL until processing finishes. A private link, an unsupported codec, an oversized master, or a publish call sent before transcoding completes are the usual failures.
Automating Long Video Uploads Through the API
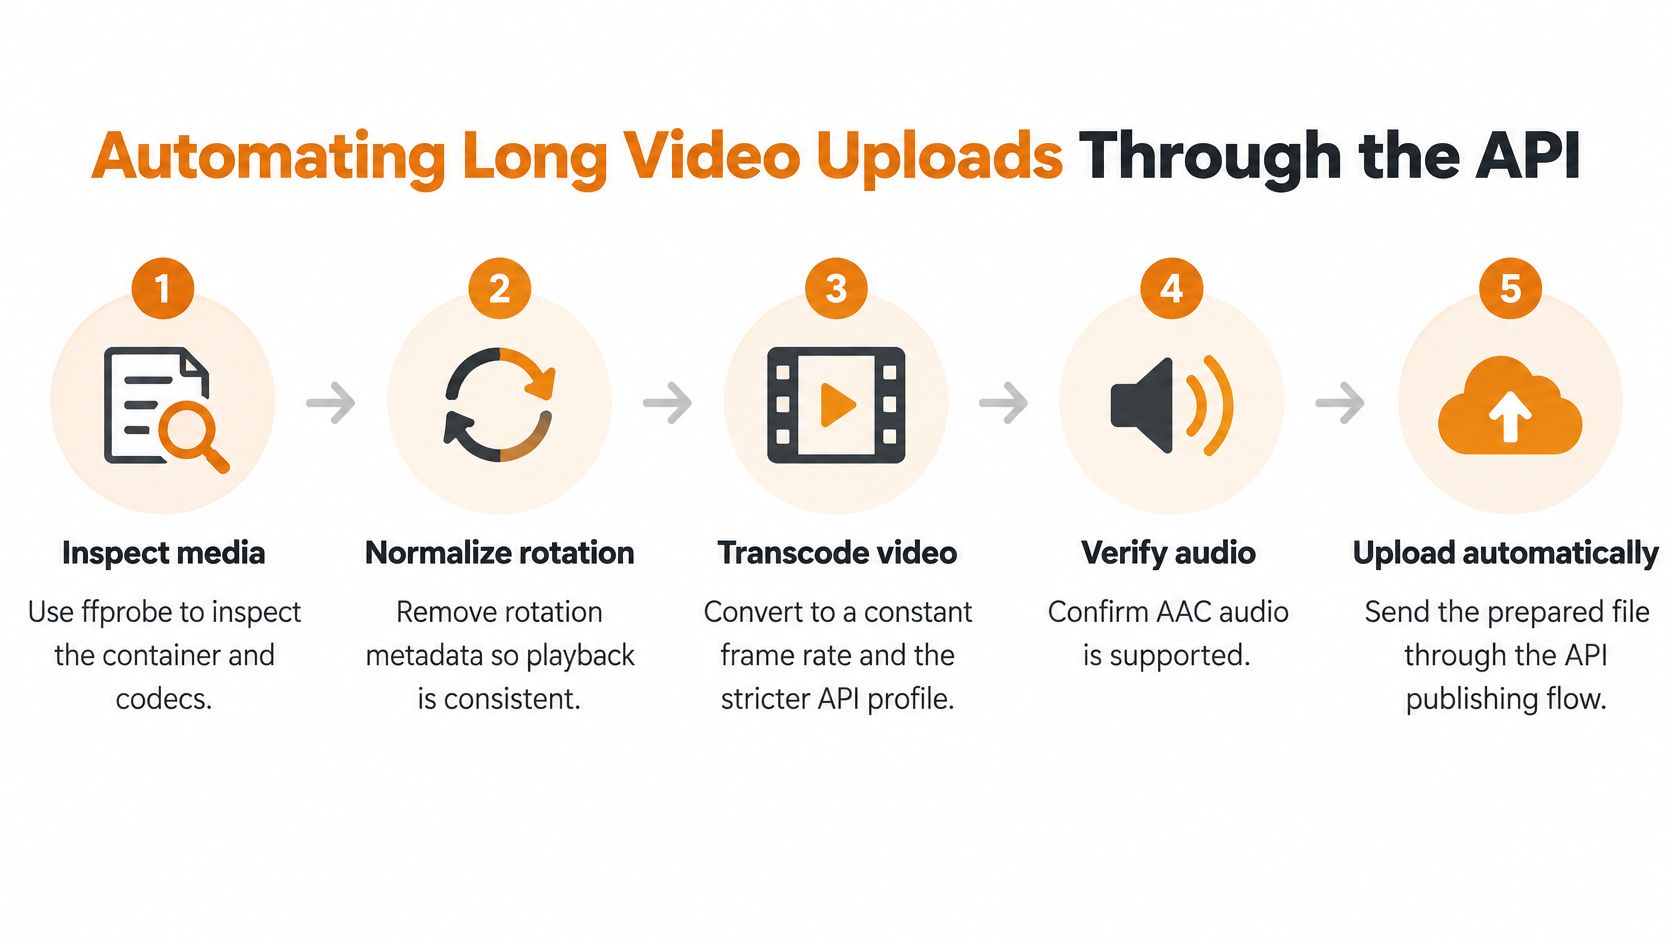
Validate the file before you enqueue the job. Waiting for Instagram to reject it wastes a queue slot and gives you a vague error. The Instagram content publishing reference supports MOV or MP4 containers, H.264 or HEVC video, AAC audio, 23 to 60 frames per second, a maximum horizontal dimension of 1,920 pixels, a recommended 9:16 ratio, and a maximum duration of 15 minutes. That API ceiling is stricter than the consumer app's Reel creation limit, so automation should enforce the API profile unless you have verified the exact account path.
Preflight sequence
- Inspect the container and codecs with
ffprobe. - Normalise rotation metadata so the phone doesn't play the file sideways.
- Transcode to a constant frame rate inside the 23 to 60 fps range.
- Cap horizontal resolution at 1,920 pixels and set a bitrate ceiling your pipeline can defend.
- Verify that audio exists and stays in sync with the picture.
- Check duration against the API limit, not the in-app ceiling.
- Host the file at a public URL that stays up for the whole attempt.
- Create a media container with
media_type=REELSand thatvideo_url. - Poll processing until the container is ready. Upload through a resumable container when your path supports it.
- Publish, and set
share_to_feed=trueonly when the Reel should also appear in the profile feed. Otherwise it stays on the Reels surface. - Retry transient failures idempotently, and keep the returned container ID for audit.
Two decisions cause most bad jobs. Teams send a file that fits the app but exceeds the API duration, and the container never becomes publishable. Teams also forget feed sharing, then wonder why a long lesson never shows on the profile grid.
Don't promise a universal success rate. The documentation specifies constraints and workflow, not a measured upload benchmark. Track your own failures by codec, duration bucket, file size, and retry count. A managed publisher can run those checks before a job is queued. Our social media posting API guide covers how Mallary validates platform media rules and handles queues and retries, so a bad master is caught before Instagram sees it.
Failed Uploads and How to Fix Them
The failure that blocks publishing most directly is a source URL that wasn't publicly accessible during the attempt. The file has to stay hosted until the job completes. If the link expires, requires a login, or flips to private mid-process, the container dies even when the video itself is fine.
| Symptom | Likely cause | Fix |
|---|---|---|
| Upload stalls or publish fails | Source URL not publicly accessible during publishing | Keep the file hosted at a public URL until the job completes |
| Video fails to process | Unsupported codec or container | Re-export as MP4 or MOV with H.264 or HEVC video and AAC audio |
| Upload rejected for file size | Oversized master file | Lower the bitrate and cap horizontal resolution at 1,920 pixels |
| Video plays sideways or cropped | Rotation metadata not normalised | Normalise rotation before uploading |
| Audio drifts out of sync | Variable frame rate | Transcode to a constant frame rate between 23 and 60 fps |
| Status shows ready but Reel is not live | Publish started before transcoding finished | Poll status until ready, then publish |
Work the rows in that order. Codec and container problems show up as a process failure after the URL is fine. An oversized master gets rejected on size, which a lower bitrate and a 1,920-pixel width cap usually clears. Sideways or cropped playback is rotation metadata, not a bad crop in the edit. Audio that drifts is almost always a variable frame rate. A status that says ready while the Reel isn't live means you published before transcoding finished.
App errors are vague on purpose. Reproduce the failure with a known-good file first, so you can separate a bad master from an account or permission problem.
Our notes on how to upload high quality videos on Instagram walk through export settings that keep detail without blowing the file size. Change one variable at a time, and log which fix worked. Changing codec, bitrate, and URL together leaves you unable to tell what saved the job.
Final Pre-Publish Checklist
Pick the length from the goal, then publish. Use the in-app ceiling when your existing followers need the full lesson. Stay at the discovery threshold when new viewers are the point. If the job runs through the API, the automated ceiling is the one that counts, not the longer in-app figure.
Run this pass before you schedule or publish:
- Match the video length to the goal in the format table.
- Confirm the export is vertical 9:16, with H.264 or HEVC video and AAC audio.
- Preview the full file on a phone. Check cuts, audio sync, and captions near the edges.
- Decide whether the Reel should also appear in the profile feed.
- Confirm the cover frame, and confirm the strongest hook opens the video.
A longer Reel reaches new viewers only when its opening holds attention, so choose the length by goal, not by the maximum the app allows.
Run the list once on a test video before you automate anything. Mallary publishes videos, images, and posts across TikTok, Instagram, YouTube, Facebook, X, LinkedIn, Pinterest, and Threads without a manual upload to each platform. The same preflight checklist belongs in the pipeline, so a scheduled Reel fails in your queue instead of on a customer's profile.
Mallary.ai gives product and marketing teams one API and dashboard for publishing Instagram Reels alongside the rest of their social accounts, with scheduling when the file meets Instagram's rules. If you're wiring long-video uploads into an app, an agent, or a client workflow, start with a test Reel and let the preflight catch codec, duration, and URL problems first. Visit Mallary.ai to set up publishing without maintaining a separate integration for every network.
Try it with Mallary
STOP!
Want ChatGPT or Claude to post on Instagram for you?
Connect your social accounts one time. Then tell your AI what to write. It can make your posts, share them, and reply on social sites that allow replies. You do not need to write code.
Pick your AI





Connect once. Ask in plain English. Mallary does the work.


